Administrator Manual
The manual go over all menus available to Administrators, such as My Unit, Chat, Talk To, Social Network, Service Requests, Amenities, Documents, Voting and Managing Units, Profiles, Features, Administrators and the public-facing website

Caue Emilio
Last Update 9 months ago
This manual is designed to help administrators quickly learn how to navigate Neigbrs' portal
If you want to download this manual, as an ebook, click here.
If you want to access this manual in Spanish, as an ebook, click here.
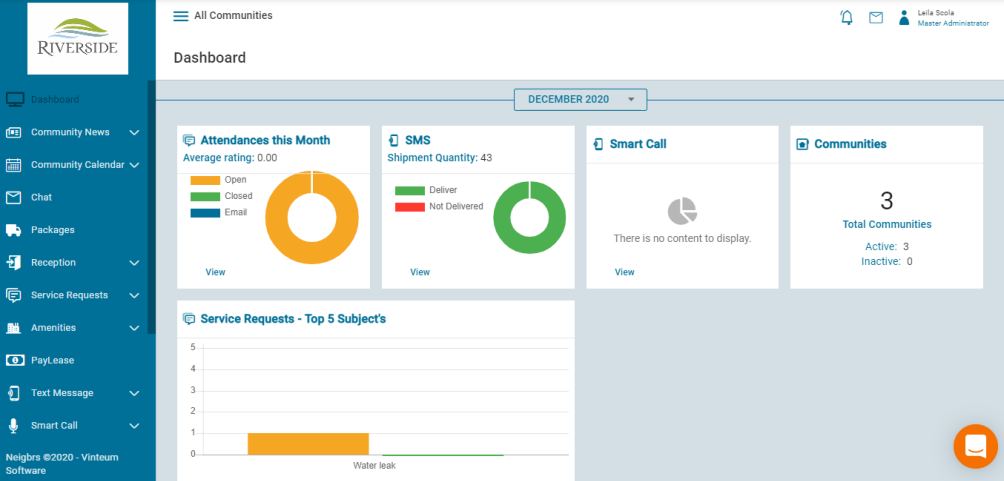
Dashboard
Your dashboard has information on service requests, text messages, smart calls,
and the number of communities you have. In the bottom right corner of the
dashboard (and throughout Neigbrs) you have an orange button. If you click
that, you can start a conversation with the team, search an article on our Help
Desk or view our most recent product update.
Community news
Community news includes notices (which sends an email blast to the residents) and the social network (where residents can post)
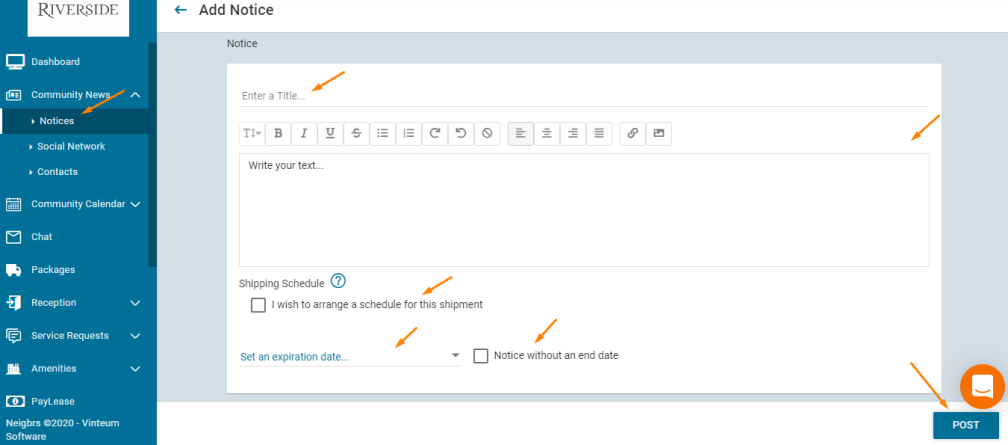
Notices
Notices send an email to all residents by default. Click on the green plus button to create one. Include the title and the message. Then you can choose to send the notice later under the Shipping Schedule.
Then you can select an expiration date when the notice won’t appear anymore, or you can choose to not include
one.
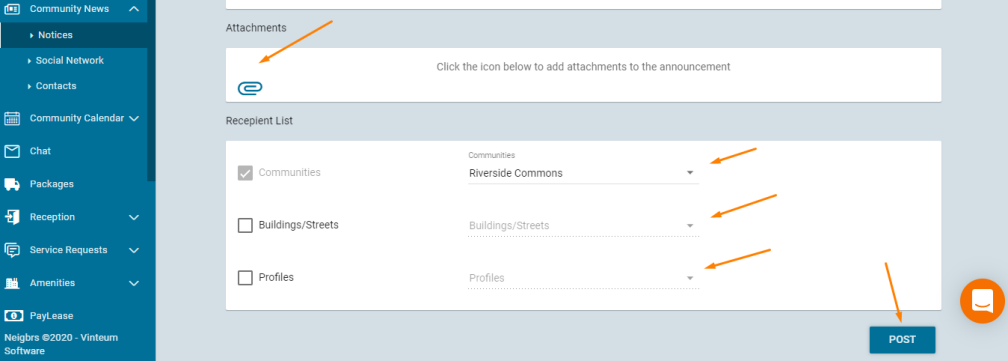
Under attachments, you can attach pdf, word, excel,
jpg, or png. Finally, the recipient list allows you to select who you will send the notice to. You can select buildings/streets if you have them, units/houses or profiles. Then click on post.
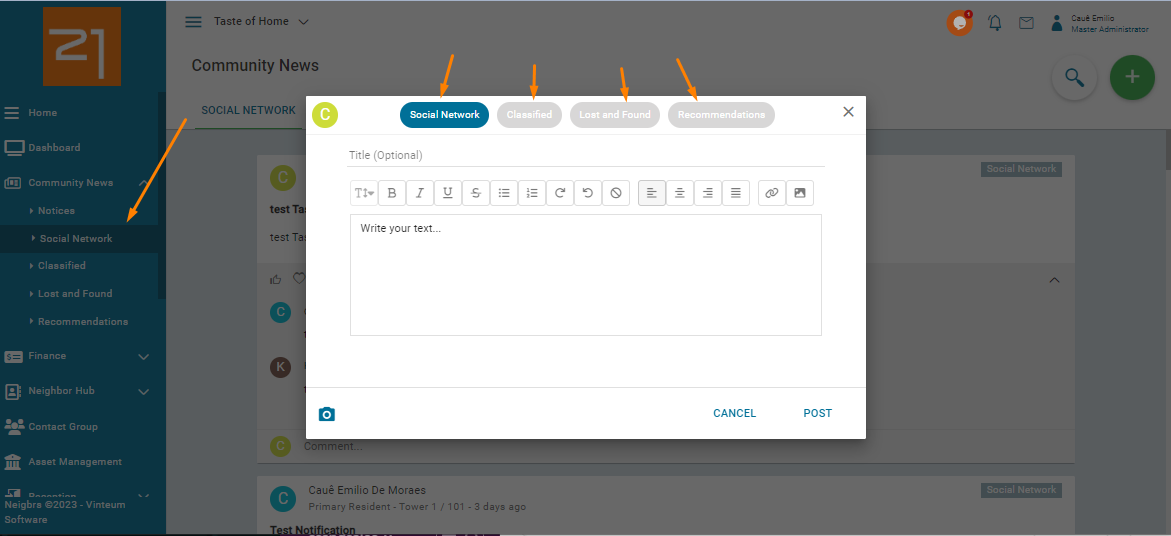
Social Network
The Social Network includes the main page and Classified, Lost and Found, and Recommendations. When you post, you can choose which page you want it to be on. They all go on Social Network, but they can also go to the other pages. You can
include the title, message, images, and then post. Administrators are able to delete inappropriate posts, and comments.
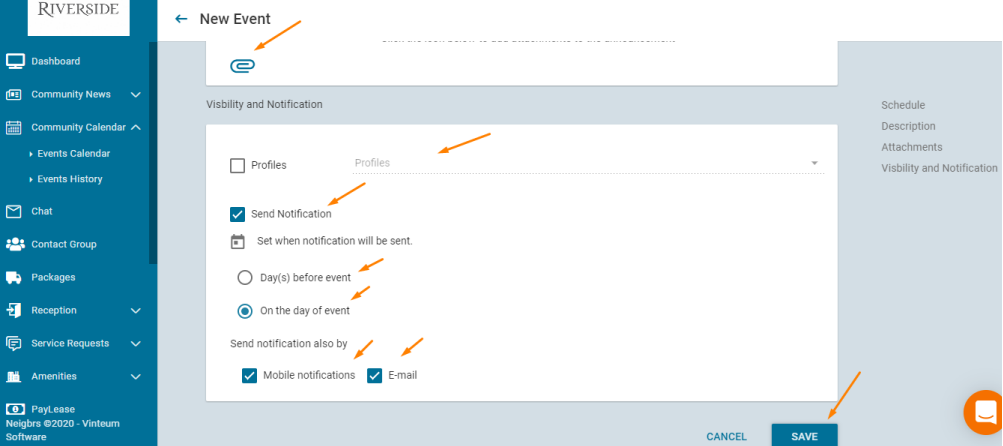
Community Calendar
The calendar shows all the events going on in your community. Go to the Events Calendar and click on the green plus button to create one. Choose the start and end date, you can choose All Day or a start or end time. If it’s a recurring event, then choose how often it recurs and until when. Then choose the title of the event and the description.
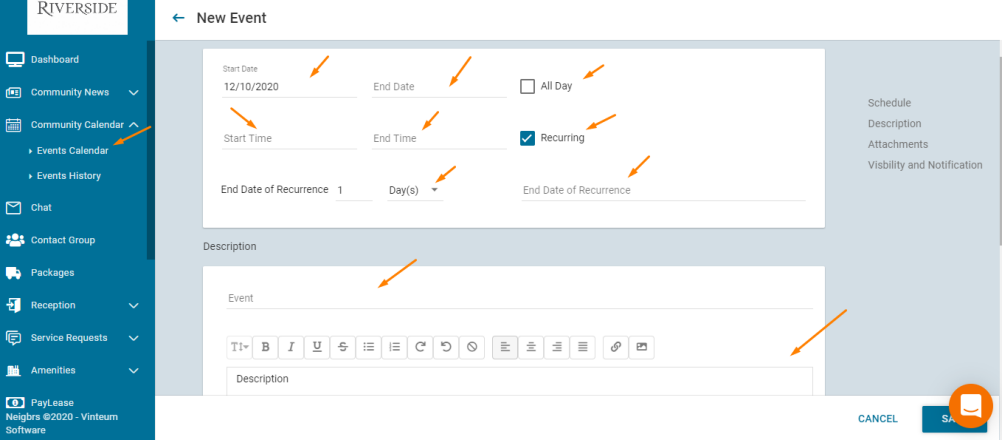
After that, you can add attachments and choose who can view the event. You can choose certain profiles to view it. Automatically the events calendar doesn’t send an email or push notification, but you can choose to send one. You can also choose when it will be sent, and on which channels.
Finally, don’t forget to save it.
Neighbor Hub
The Neighbor Hub has two menus where the residents can use to connect with their neighbors. Those menus are: Member's Directory and Chat.
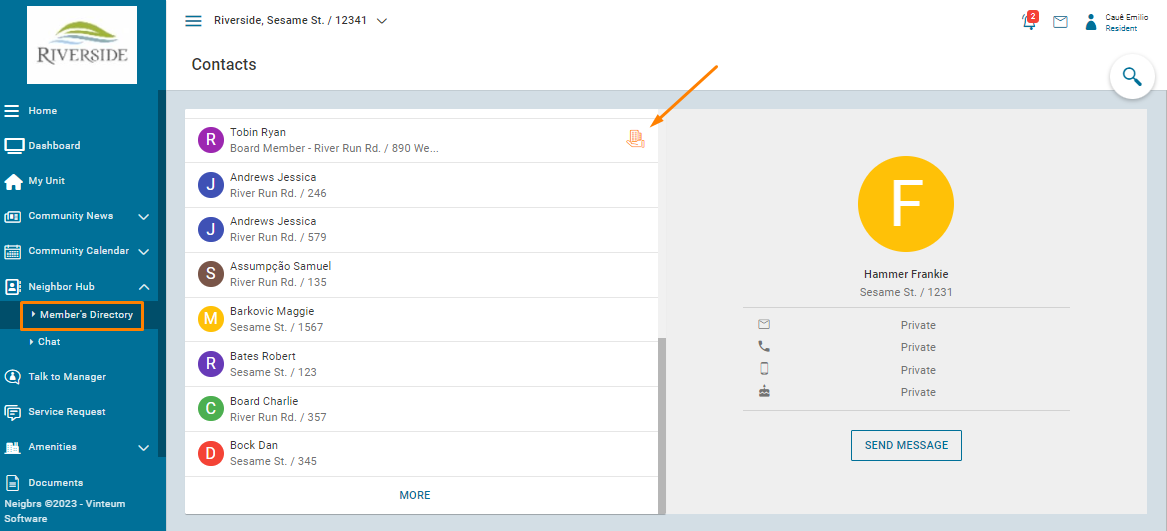
Member's Directory
The contacts tab is your community directory for your residents.
It is automatically populated with residents’ information when you upload units/houses. Representatives have an orange symbol of a building.
You can search for people, by clicking on the magnifying glass symbol. When you click on a person, you can see the name and address.
Automatically, everyone is on the contacts list. Residents’ information is private, but they can choose to share their contact information (only the resident can change their settings). The button to send a message is automatically shown when the resident is active, though residents can deactivate that (administrators cannot).
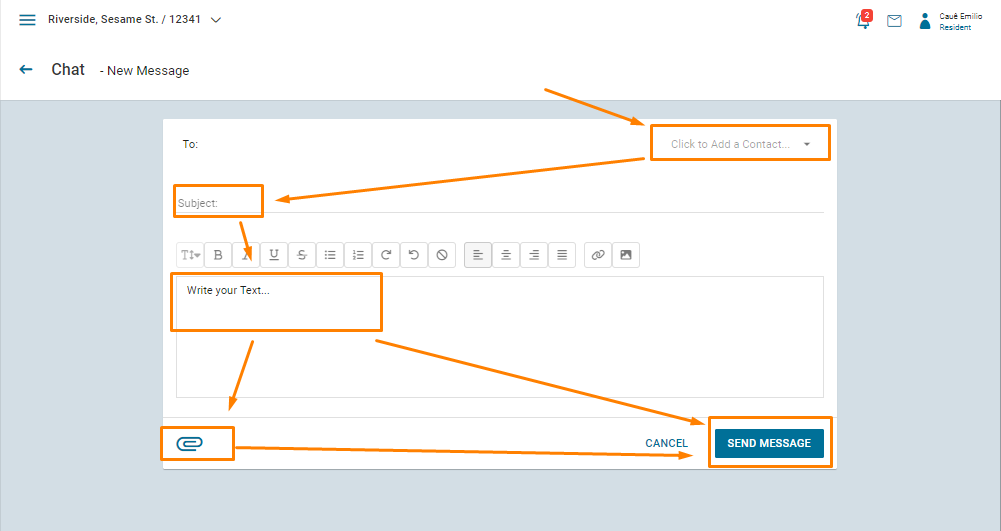
Chat
The chat is where you can send a message to all community residents. Click on the green plus button and you have the option to send a message to an individual or a group (we’ll see how to create a group here). Click to choose who you want to send a message to, include a subject, write your message, add
attachments, and then send the message.
Residents will receive a message in the portal and they can reply to it.
This is where you can message groups as well, and residents receive notifications when they get a chat message but they have to reply in the system.
Contact group
This is where you can create a group. This is great for committees, you can add residents or administrators here.
All groups must have an administrator in them, residents can’t create them.
Groups only become active when the administrator sends a message to the group via the Chat. All groups are private, so no resident outside the group can see the messages unless they are invited to the group.
Click on the plus button, insert the name of the group, then choose the contacts and save. After that, you can message the group in Chat. Residents receive a notification, but they have to answer in Chat.

Asset management
Asset management is where you can add any assets that your community owns (eg gym equipment, a shared roof). Click on the green plus button, you can choose a picture or take one if you like. Include the description or name of the asset, if it’s in use or not (active or inactive).
Then say how many you have, the condition, you can include the model and brand. If you have a specific number you assign them, add an asset number, and the serial number. You can include where the asset is located. Scrolling down, you can add the invoice, price, when you bought it when the warranty
ends. Then you can add any extra details and save.

Packages
Packages are where you can add packages if your community collects them in one place. When a package arrives, add it to the system, and then when the resident picks it up, you can log it as having been picked up.
To add a new package, click on the plus button. Add the building/street and unit/house information, then choose the date it arrives and the time. Add the name of the recipient, who sent it, its status and you can add any details or photos. Then save. This sends an email to residents (and push notification if they have the app).
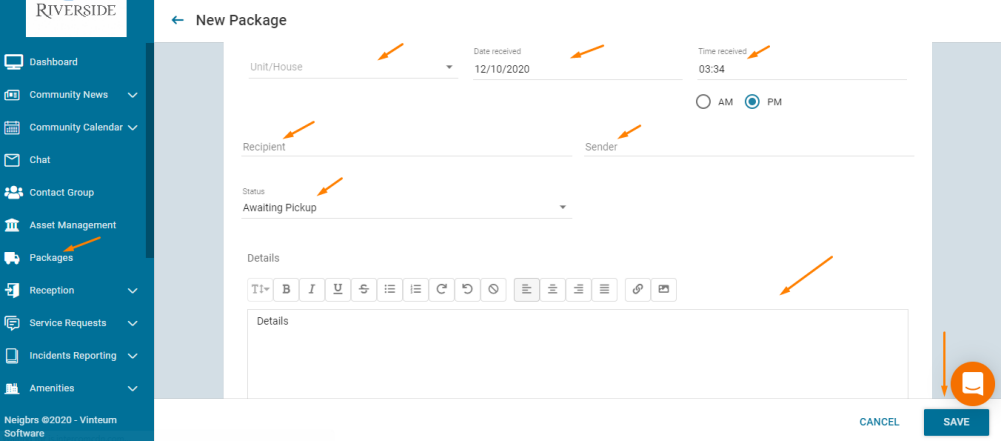
When the resident comes to pick it up, you can log that they received it. Click on the envelope, then in the box that appears add the name of the resident who picked it up, and the date, and time. Then save it.If they don’t pick it up, you can send them a reminder by clicking on the bell symbol. If you want to view the package, click on the eye or you can edit it by clicking on the pencil. You can also delete the package log if there was an error.
Reception
In reception, you can log the guests that arrive at the community and download a report about them. You can also view all residents, vehicles, and pets in the community. Finally, guards can add notes about their shift.
Access Control
Guards can search for visitors who have already come to the community or that residents have logged by searching for the license plate or name. You have to include an identity card (or any unique number - eg a phone number), then their name. You can add any additional information, such as the name of the company, email, or work number. You can also include vehicle information.
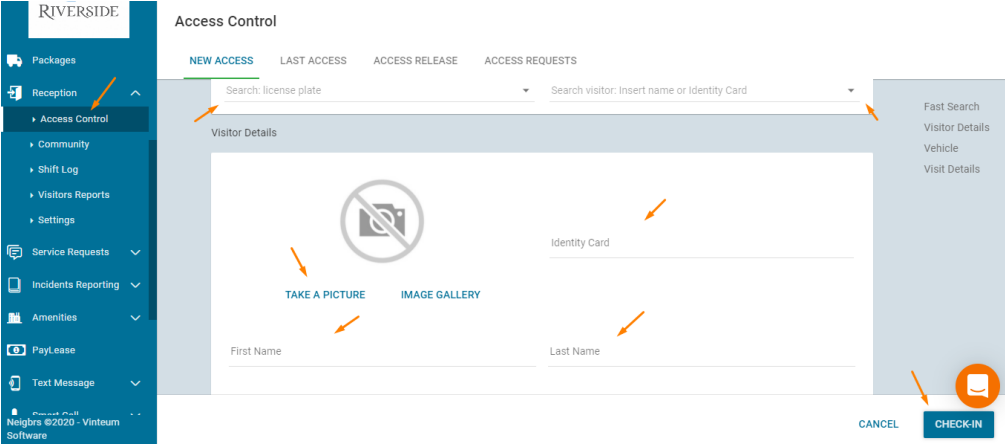
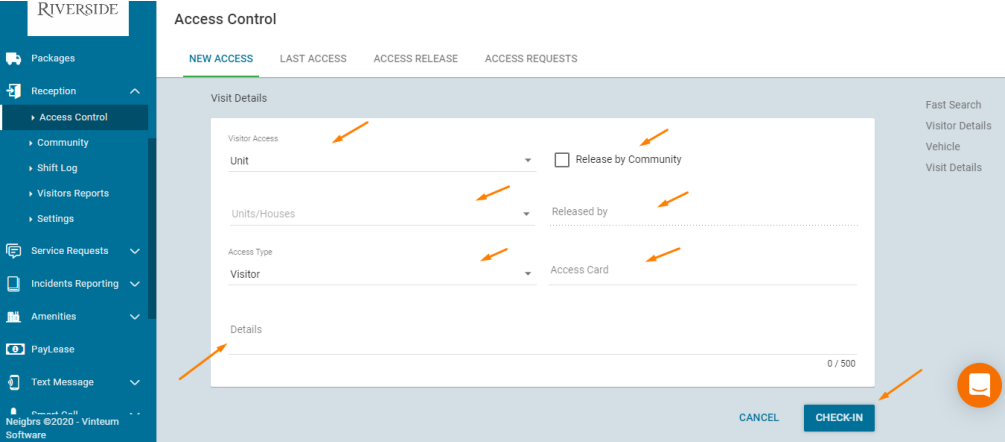
You can choose if the visitor is going to a unit/house or a common area. If they’re coming to fix something in a common area, they can be released by the community rather than a specific unit/house. If they’re coming to visit a unit/house, you can include the resident they’re coming to see. Then, you can choose if they’re a guest/service provider and their access number if relevant.
You can add any details and save.
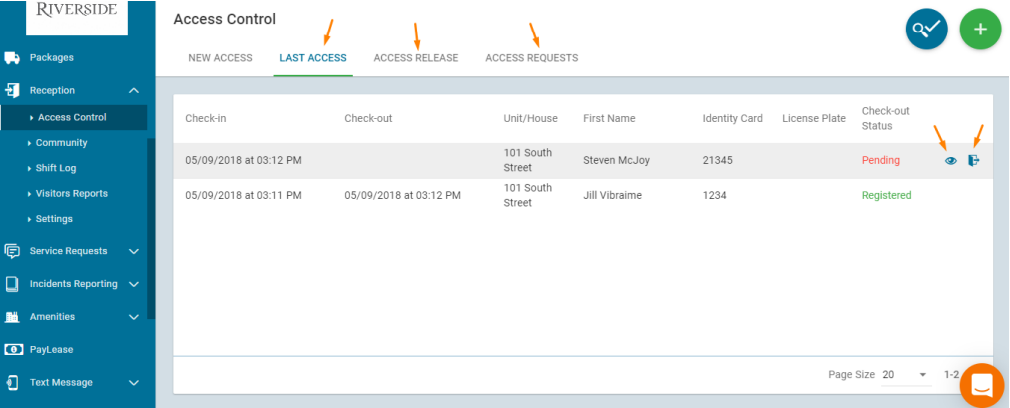
In last access, you can see the people who have recently come to the community. You can also check them out. You can’t check them in again until they’ve been checked out. In access release, you can see guests who residents have pre-approved to come into the community. By clicking on the eye you can see the resident’s phone number if you want to call them to inform them their
guest has arrived.
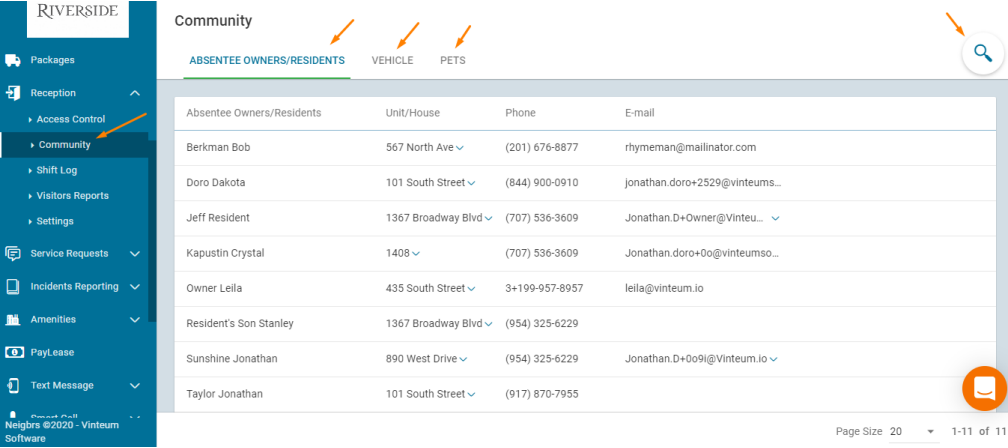
Community
In the community tab, you can see residents, vehicles, and pets. The purpose of the Community tab is to profiles with less access, like Concierges and Staff, be able to search for different fields, such as pets and vehicle information.
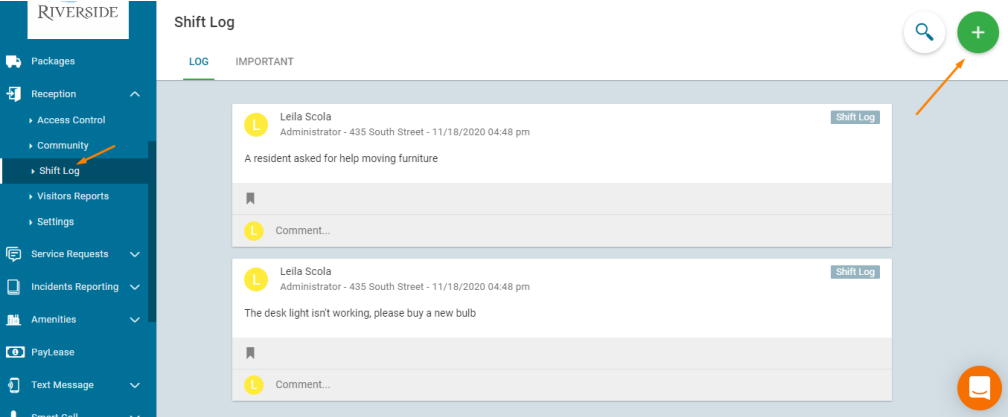
Shift Log
In the shift log, staff can add notes about things that happened on their shift.
Click on the green plus button, write your message, add images, and click on post.
Visitors Report
In the visitors report, you can download reports of people who have arrived at the community.

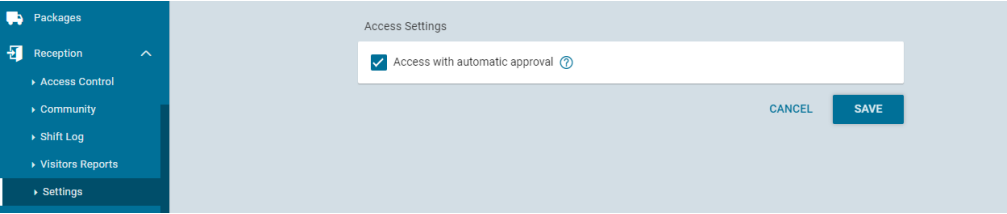
Settings
Settings allows you to choose if you want to allow automatic approval of guests or having the staff approving them.
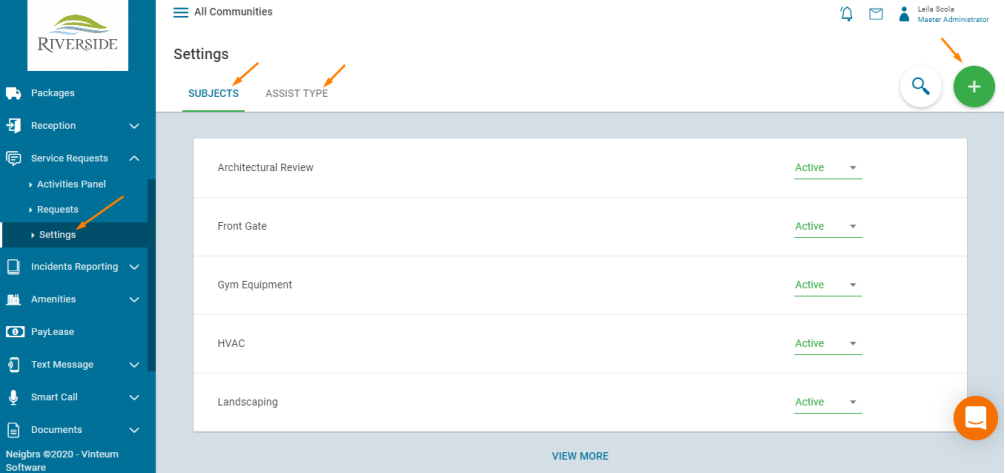
Service Request
To set up service requests (which is where you can manage work orders), click on settings. In subjects, click on the green plus button, add the subject name, and choose the administrators who receive the emails about the service request. Then in Assist Type, choose if you want to manage service requests in the system (so you can communicate with the resident) or via email (so you have
to email residents about the request).
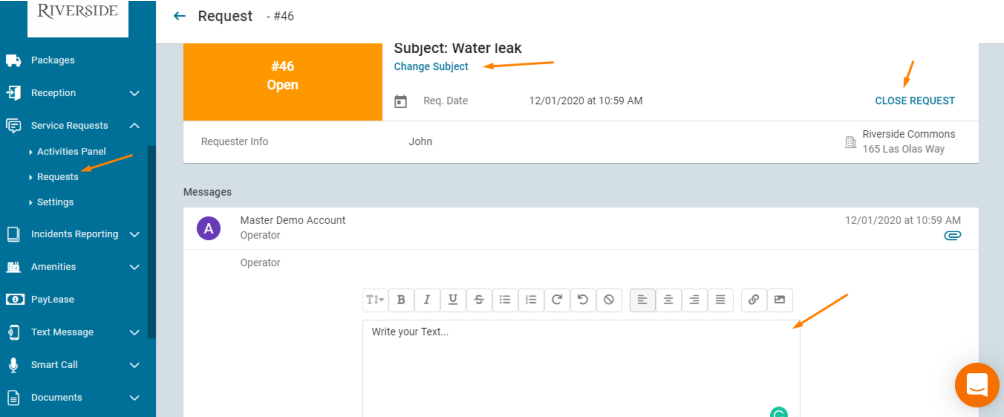
Residents create service requests in Requests. When you receive a request, then you can click on it to open it, view the request, and reply to it. You can change the subject, close the request, or reply to it. When you reply to it, you can change the status to in progress, or closed.
Incidents reporting
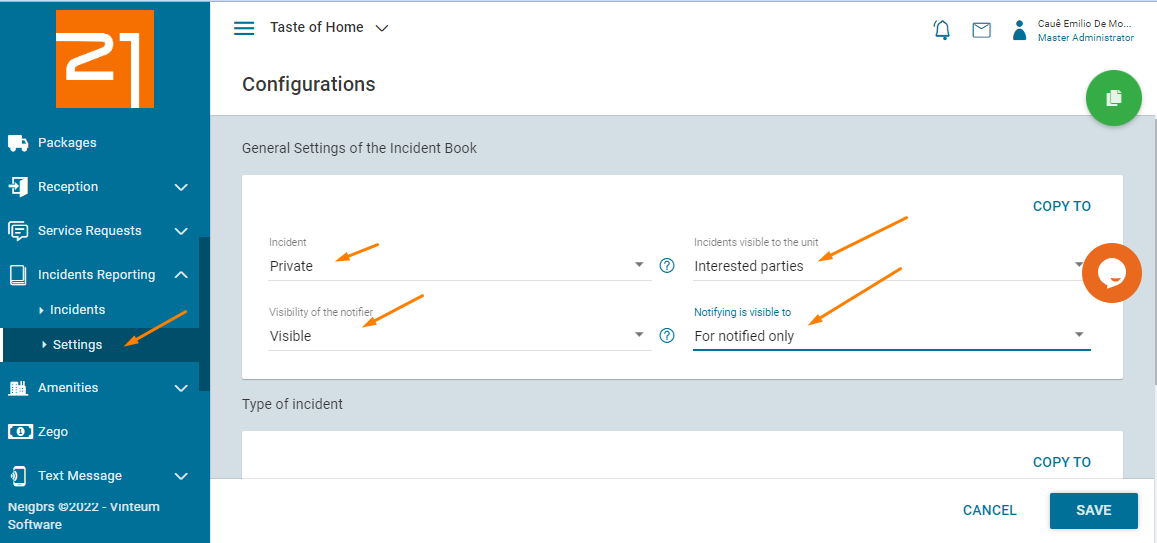
Incidents reporting is a pre-violations tool. Residents can report any violations they see and the responsible person can decide what follow-up action should be taken. To set up incidents reporting, go to settings. Then you choose how you want it to be setup. You can choose if all residents can view all incidents or
just the ones they’re involved in. You can also choose who can see the name of the person who reported the incident. In Type of Incident you can add different topics and who is responsible for them.
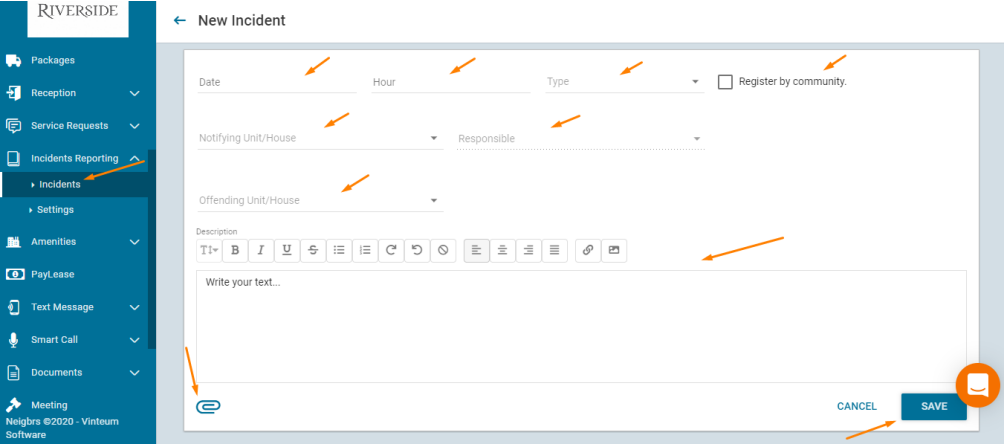
Residents then post their incidents in Incidents. Click on the green plus button.
They can choose the date and time the incident occurred, and then the type of incident. As a master administrator, you can register an incident by the community rather than an individual unit/house. If known, you can include the offending unit/house. Then include the description, attachments, and save. The person responsible gets notified of the incident.
Amenities
Set up
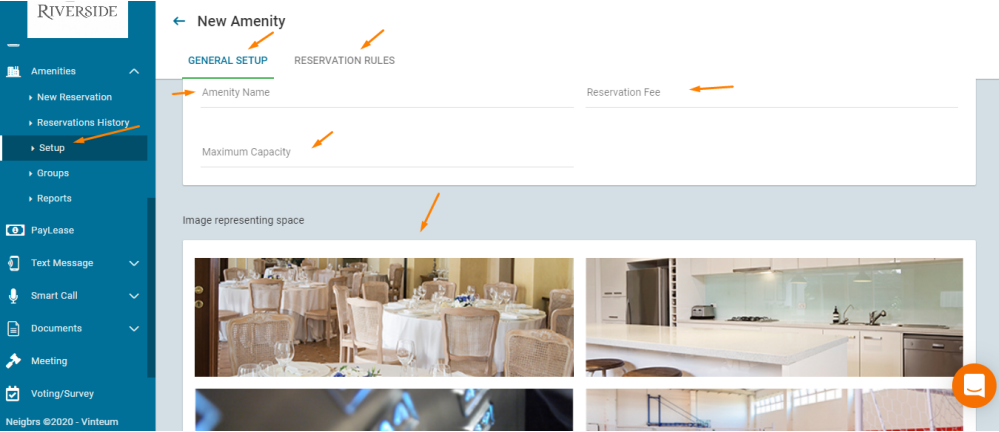
Let’s start in setup to add community amenities. Click on the green plus button, add the name of the amenity, any fee, maximum capacity, and choose a gallery image. If you have any images of your amenity then you can add them at the bottom, but you do need to choose a gallery image. After that, click on save.
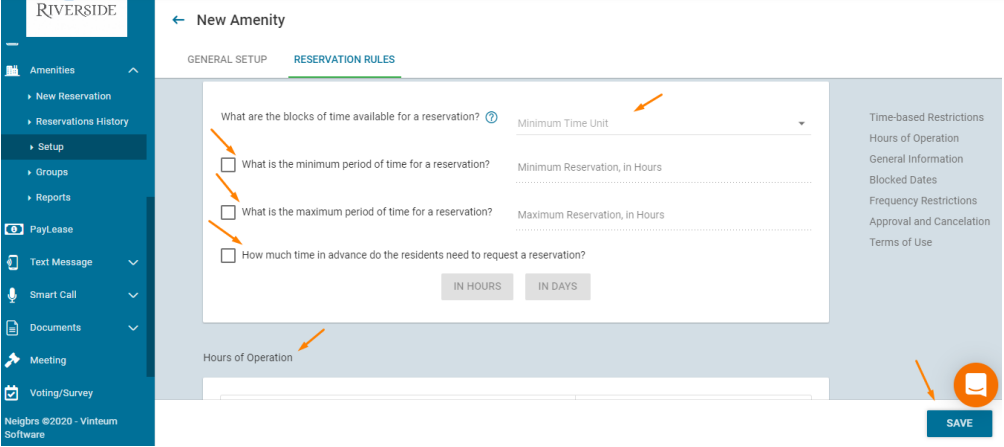
In reservation rules, you can set up all the rules for your amenity. You can choose blocks of time, for minimum and maximum time it can be reserved. You can also choose how much time they need to reserve it in advance. In hours of operation, choose the times it’s open. Delete all the times, and then choose the dates and time and add them. After that, include any general information. You can also select any dates the amenity is closed.
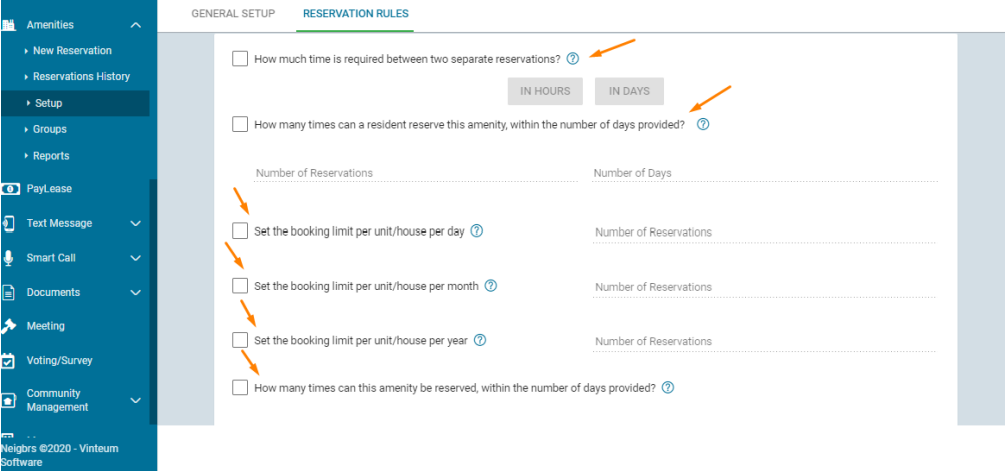
In frequency restriction, you can choose how much time they need before two reservations, how many times a resident can book within a certain number of days. You can also limit per unit/house per day, month, or year. As well as how many times the amenity can be reserved.
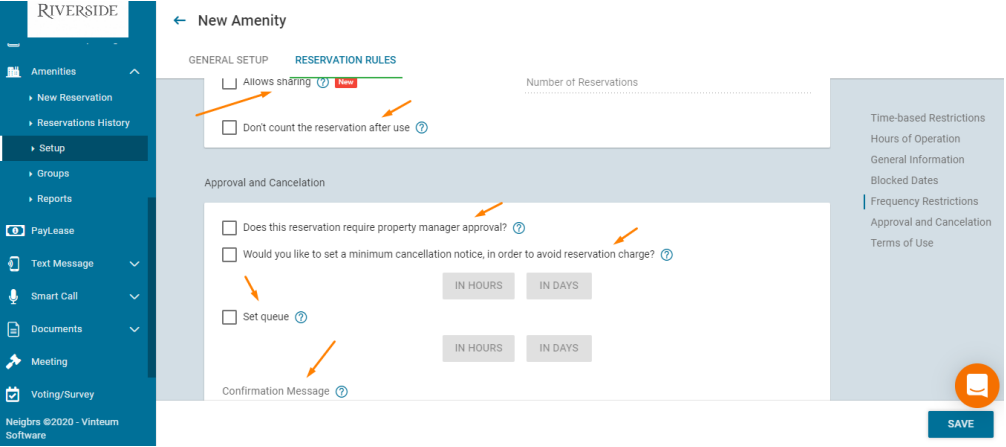
The next option allows more than one person to reserve the amenity at one time. You can also not count the reservation after, so it doesn’t count to the limit. You can include manager approval, so you need it to be approved first. You can include a minimum cancellation notice and create a waiting list.
Then, you can add a confirmation message to appear for residents. Finally, you can add terms of use. Then save!
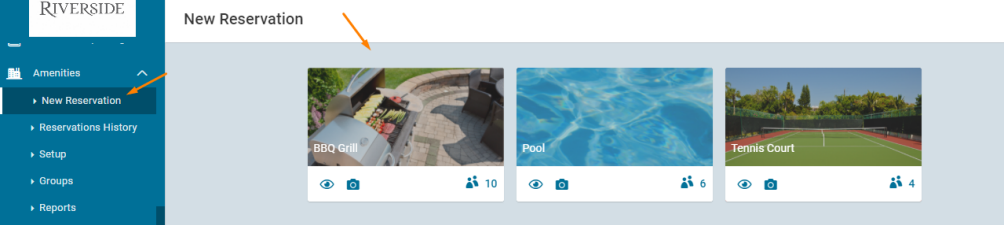
New Reservation
In New Reservation, residents can click on an amenity, select the date and time on the calendar. If you have added terms of use, they’ll have to accept them before reserving.
All residents and administrators can see reservations on the calendar. Approved, and pending reservations have different colors so you can easily see the reservation status.
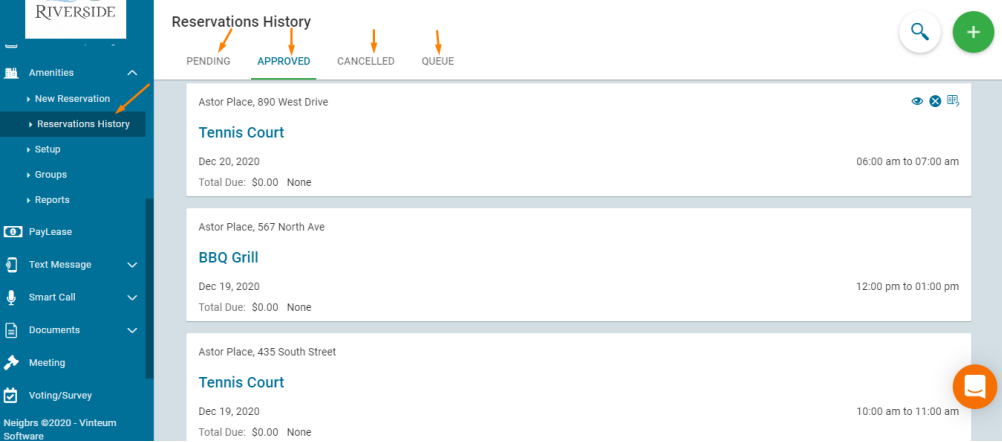
Reservations history
The reservations history tab shows past, pending, approved, and cancelled reservations. In reports, you can download reports.
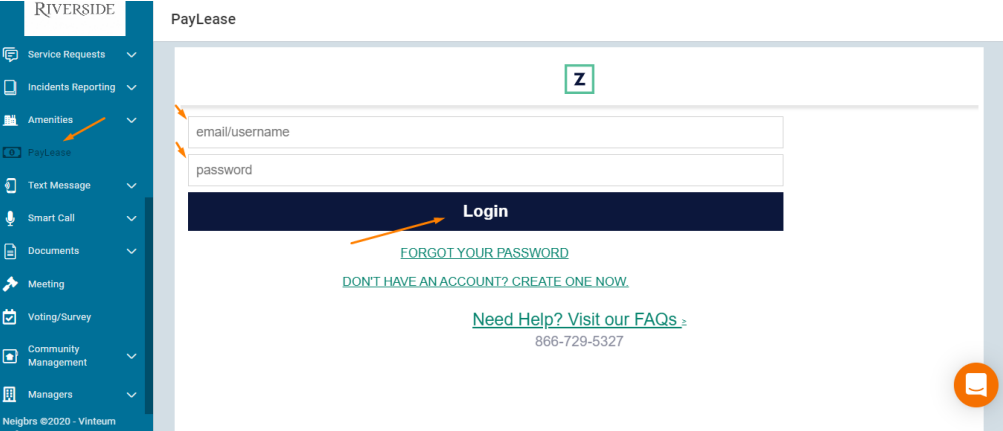
Zego
We partner with Zego. If you have an account with them, you can
log in here. If you don’t, get in touch with them here.
Text Messages
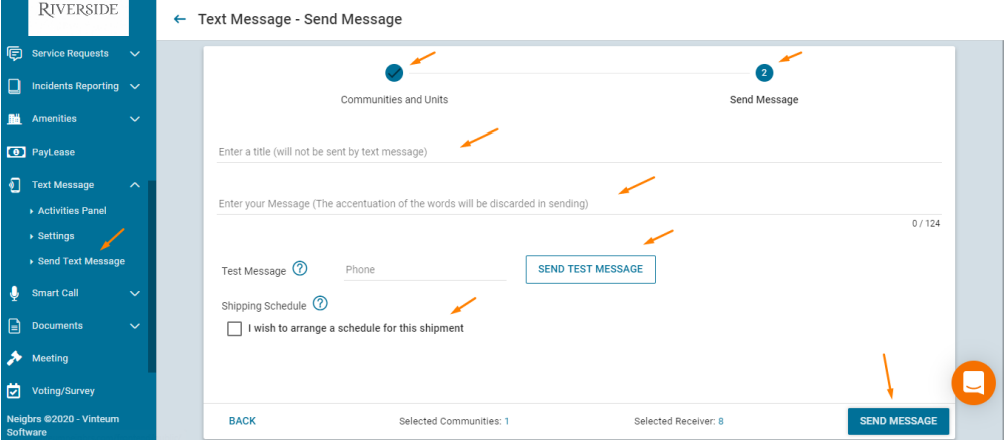
In the standard plan, you have 5 text blasts per month, the premium plan includes unlimited text messages. To send a manual text message, click on Send Text Message. Click on the plus button, select the whole community or individual residents. Include a title, your message, send a test message and you can choose to send it later under Shipping Schedule, then send the text
message.
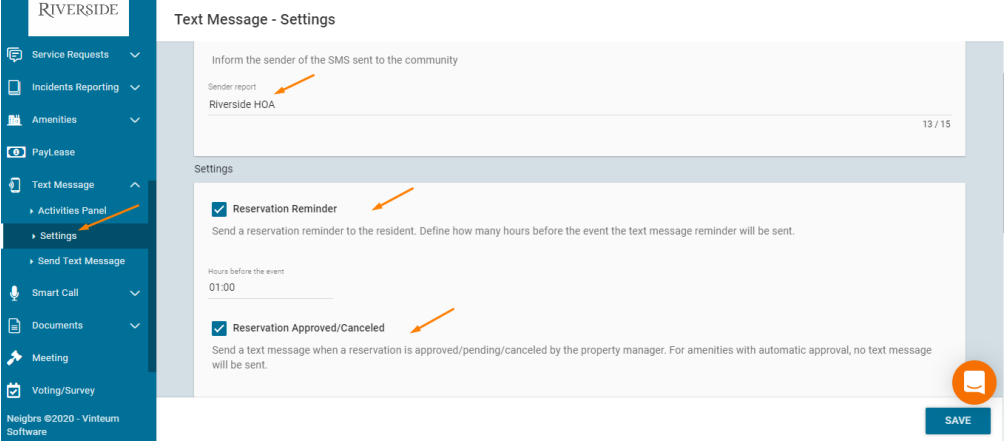
In settings, you can include the name of the sender and set up automatic texts.
You can send automatic texts for amenities, notices, packages, and service requests. You can also set up daytime sending (from 8 am - 7 pm).
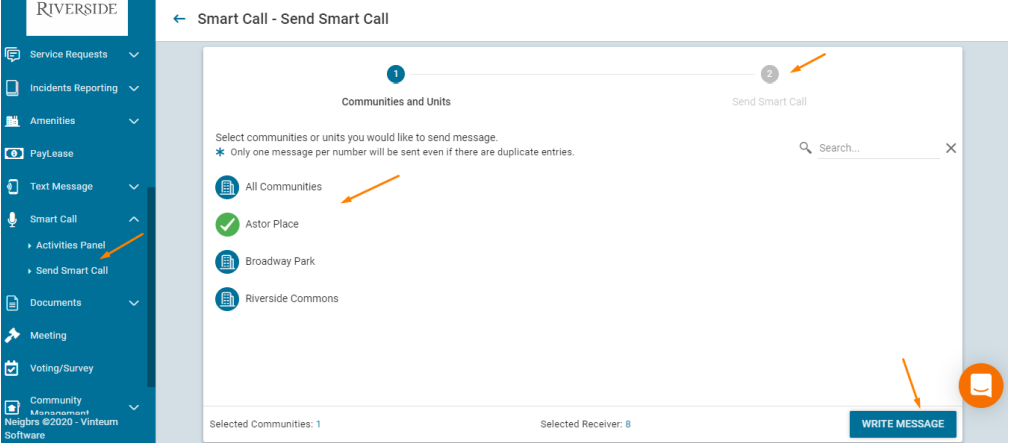
Smart calls
Smart calls send a call to residents’ phones and an automatic voice reads the message you’ve typed in. Select Send Smart Call, click on the green plus button, and select the whole community or specific residents. Click on write message, and then it’s the same as a text message, including the title, message, send a test call, and send the call.
Documents
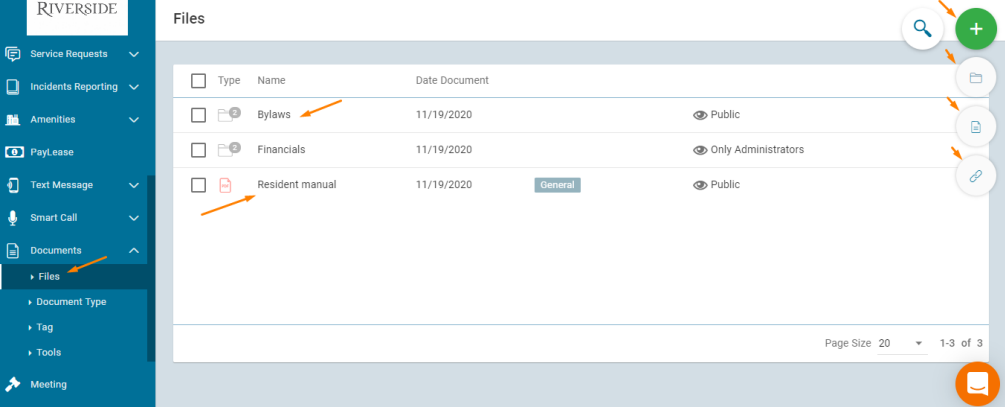
Go to Documents, then Files. Click the green plus button, and choose folder, file, or link.
Folder: Create a folder to add different files to, you can also create sub-folders. The main folder can't have a higher level of privacy than sub-folders.
File: You can add files from your computer. You can edit the name of the file, the document type, who can see the file. You can also change the document date, create a due date and a public URL (which creates a link that you can share). Finally, you can choose to send a notification to residents to let them
know you've added a new document. To view a document, click on the name of a document.
Link: Adding a link is similar, you should add the link, the name of the link, the type, who can view it. You can choose to send a notification, change the date and add a due date.
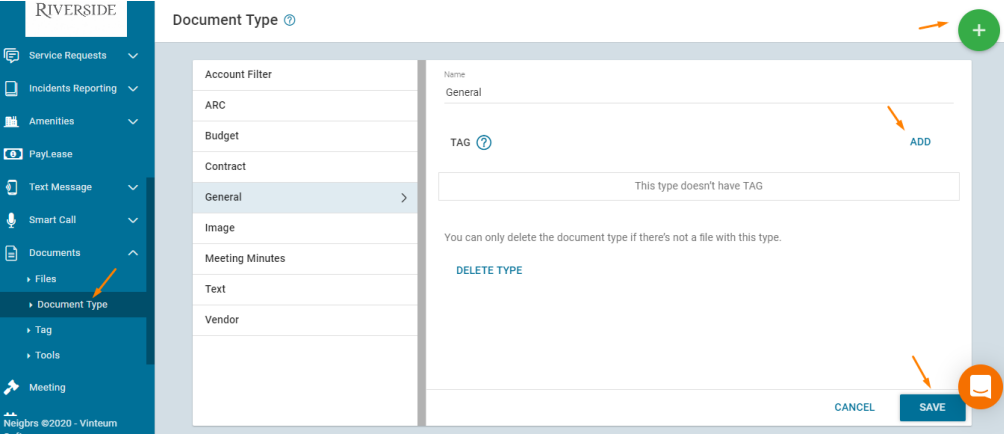
In document type, you can add types of files (eg Excel, Word, Image, Link) or the type of document (eg meeting minutes or contracts). Click on the green plus button, include the name and you can include tags. If you have a lot of documents, tags can help you to find them.
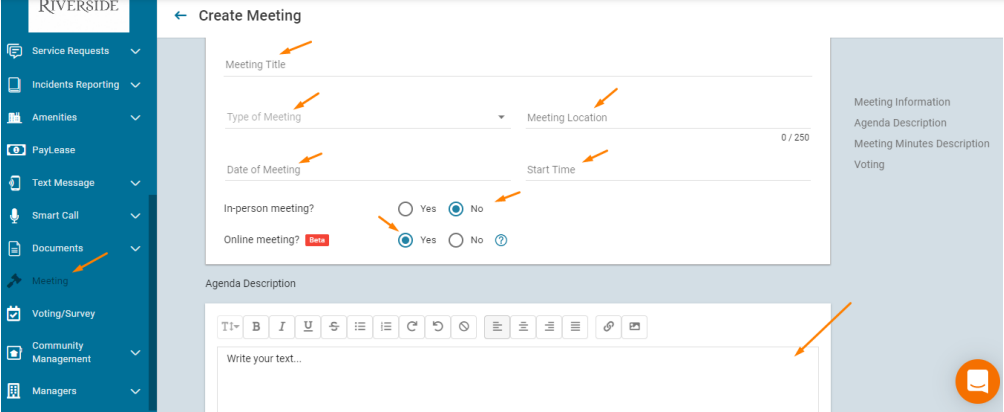
Meetings
You can create online meetings here. Alternatively, you can use it to notify residents about in-person meetings. Click on the green plus button, add the title, the type of meeting, and the location. Then include the date and time. If the meeting is going to be online, then in-person must be off. If it’s online then you’ll be able to access the online meeting room 2 hours before the meeting
starts. You can include the agenda, and after the meeting, you can add meeting minutes as well.
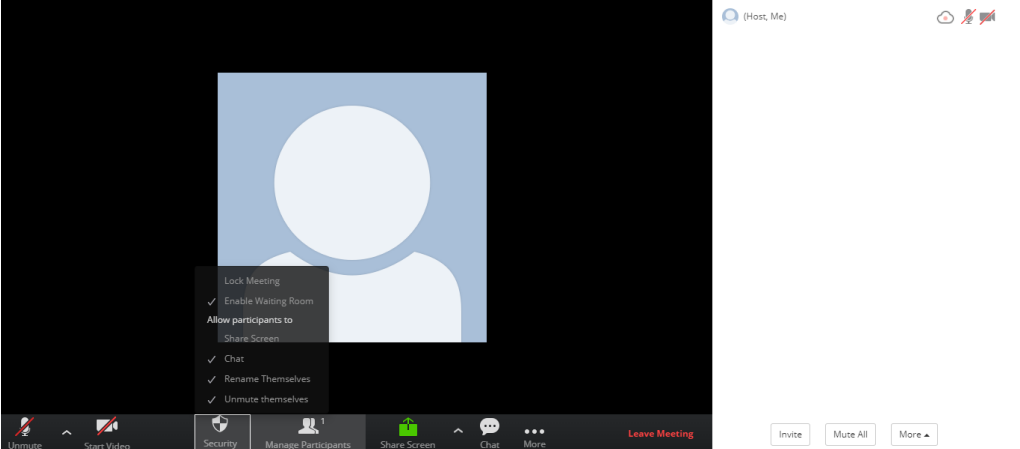
When you start the meeting, it looks like Zoom. Participants can raise their hand to speak and send chat messages. The host can mute everyone and remove them from the meeting if necessary. The meeting is automatically recorded.
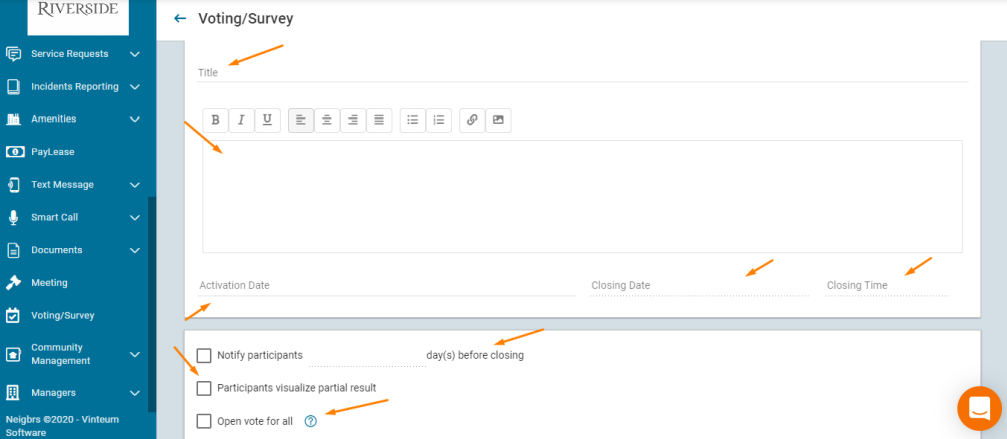
Voting/Survey
A survey is a great way to get the informal opinion of residents’. To create one, click on the green plus button. Include the title, a description, when it starts, ends, and the time it ends. You can remind residents to vote, allow them to view the results before the survey closes and by opening the vote, you can view who
voted for what. You can restrict who can vote by buildings/street, unit/house, or profile.
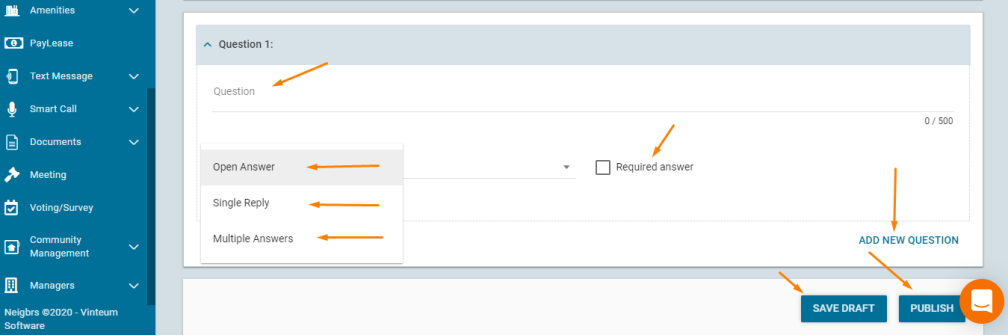
Include the question you want to ask, and then the type of reply. The open answer option is just a text box, single reply is choosing one option and multiple answers is choosing more than one reply. You can make the question obligatory, and you can add more than one question. Then choose to save it as a draft or publish. Once published, you can’t edit it, you’d have to delete it.
Community Management
Community management includes all the options to manage your community.
Community
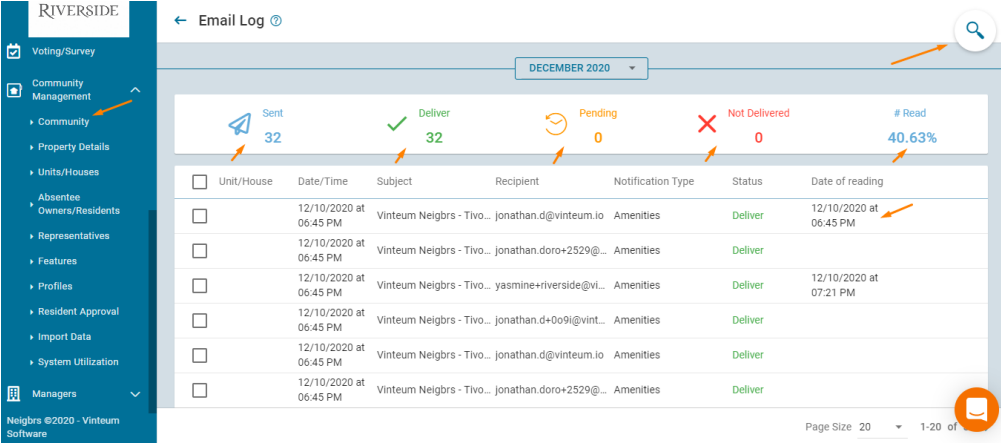
This is where you can see all communities that you manage. Hovering over the community, you can download the excel with residents’ information and the emails the system has sent.
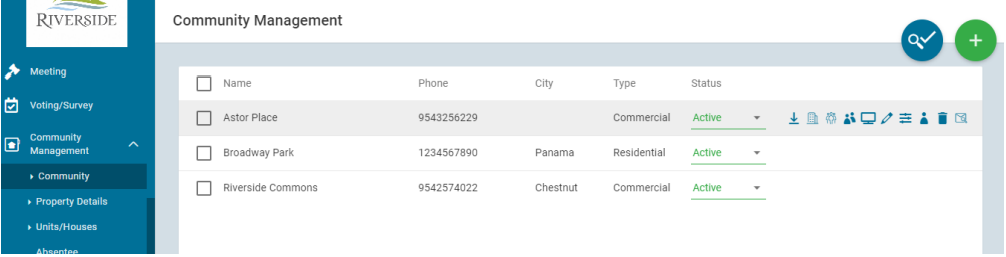
Clicking on the envelope symbol to view the email log. It shows you how many emails were sent, delivered, pending, not delivered, and read per month. To see types of emails (notices, amenities etc), the email of the recipient, their unit and when it was sent you can filter by clicking on the magnifying glass.
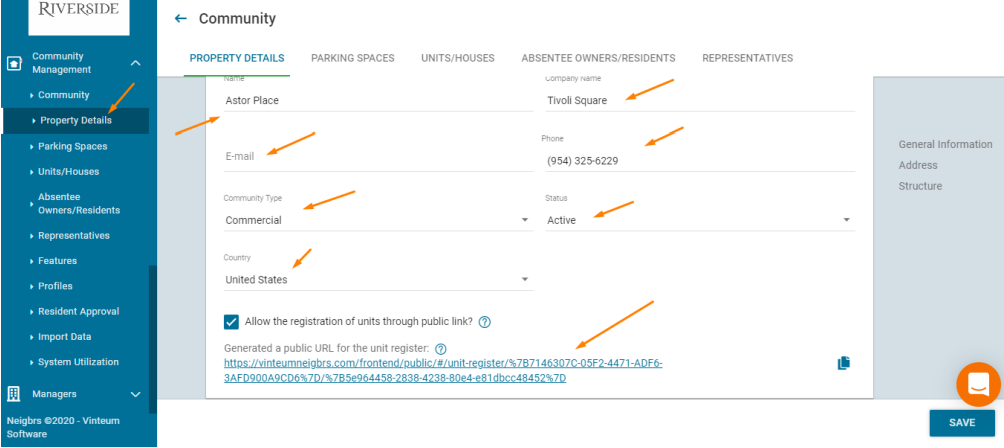
Property details
Update your community’s name and contact information. You can include the country and address as well. The public link allows residents to sign up to the platform, then an administrator can approve them in Resident Approval.
Alternatively, you can download the spreadsheet in import data and re-upload it with resident information.
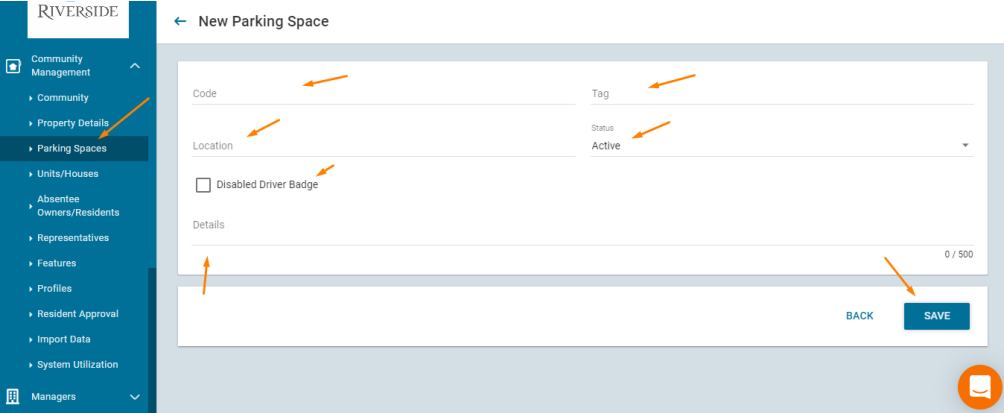
Parking spaces
If your community has specific parking spaces. You can include their code, tag, location, and status. If it’s a disabled space then you can mark it as such. You can add any details and save them. In each unit/house you can assign them a parking space.
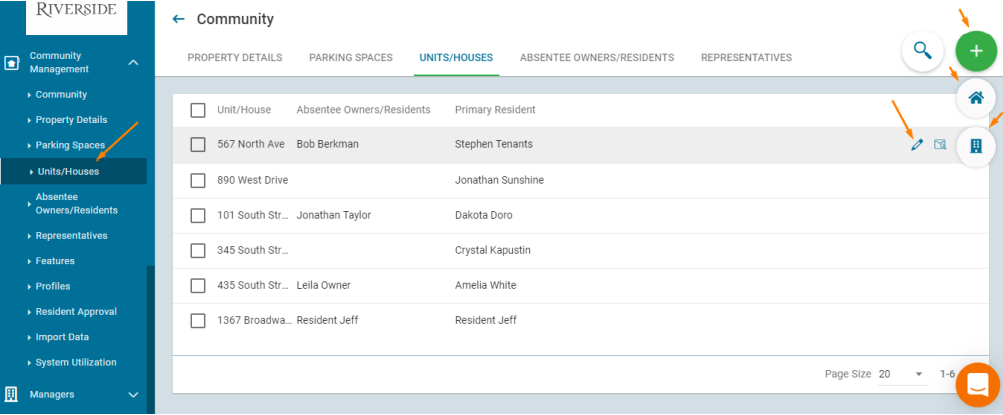
Units/Houses
Here you can view all the units/houses in one place. By hovering over the unit/house, you can edit the unit/house. You can also add new units/houses by clicking the plus button.
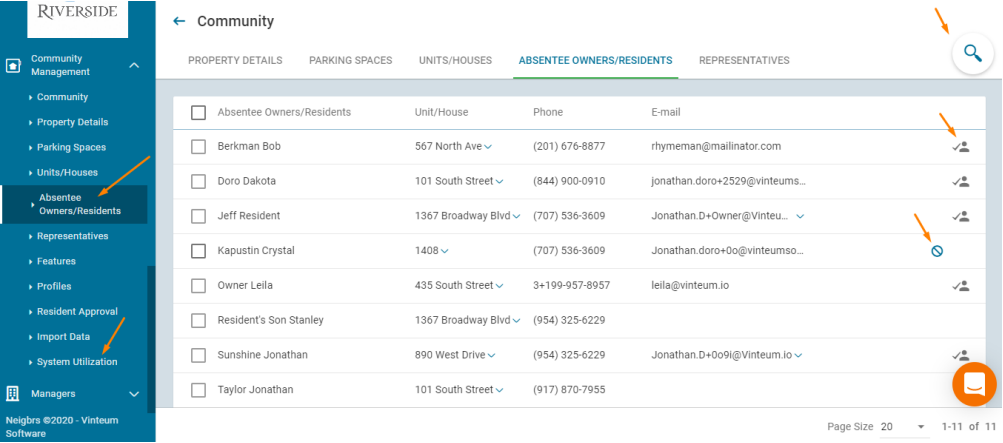
Absentee Owners/Residents
In this tab, you can see all the residents. By clicking on the square in the top left you select the whole page and click on invite to invite them to the system. The icons next to their name tell you their status. The person with a tick means they’re active (they’ve created their password), the envelope with an arrow means they haven’t created a password yet and the stop icon means their email
is invalid. To see how many people are active, go to system utilization. You can see the total number of units/houses, how many people are active in the system (that means they've made their password) and the percentage of people who are active.
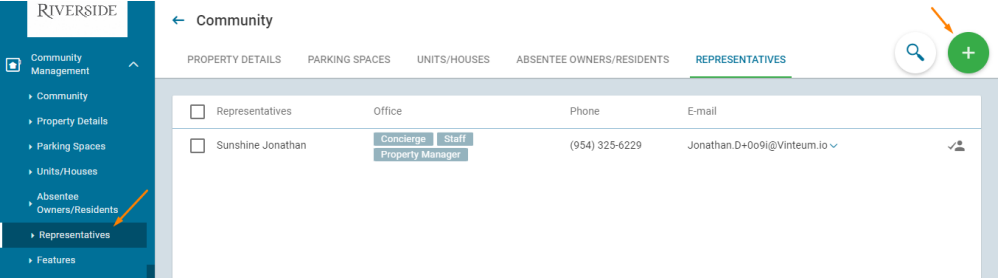
In this tab, you can see all the representatives. By clicking on the square in the top left you select the whole page and click on invite to invite them to the system. The icons next to their name tell you their status. The person with a tick means they’re active (they’ve created their password), the envelope with an arrow means they haven’t created a password yet and the stop icon means their email is invalid. The 'Office' column shows which profiles that user has.
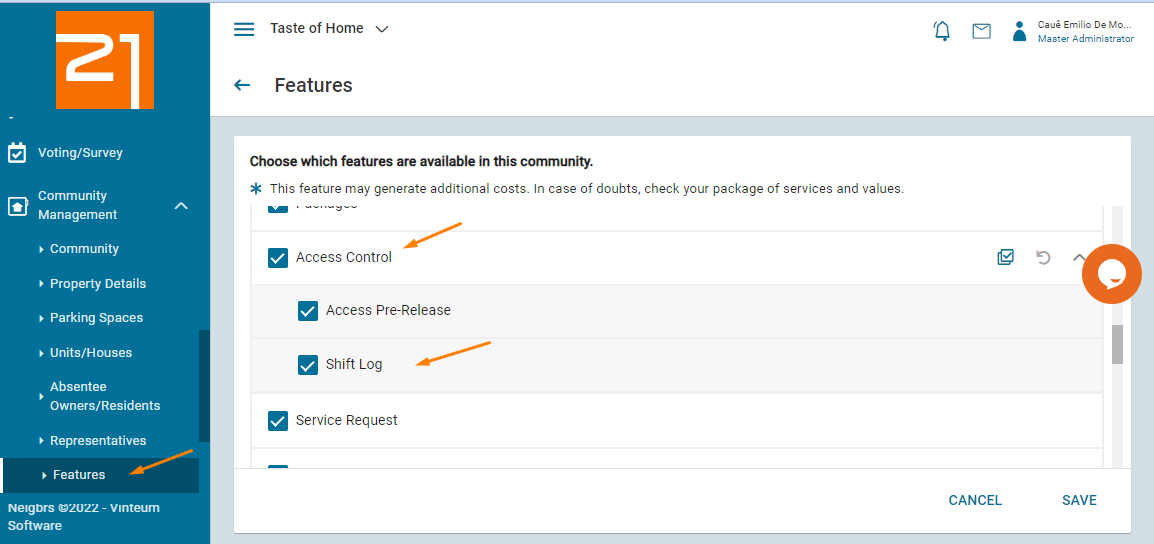
Features
Here you can decide what features appear in your portal. Untick the features you don’t want and then save. They are arranged by the categories in the menu, so to find Shift Log, click on the arrow next to Access Control.
Some features may be restricted based on your plan.
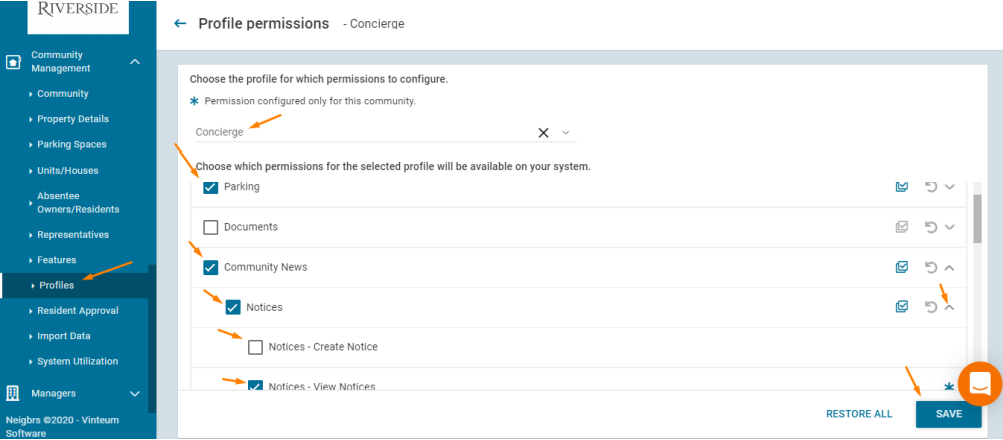
Profiles
The profiles tab is where you manage the different features for each profile. Choose the profile, the features, and then save. You can see below that the concierge can manage parking, they can’t see documents and they can view notices, but not create one.
Managers
Only master administrators can see this section. It manages not only each community (if you have more than one) but the whole portal.
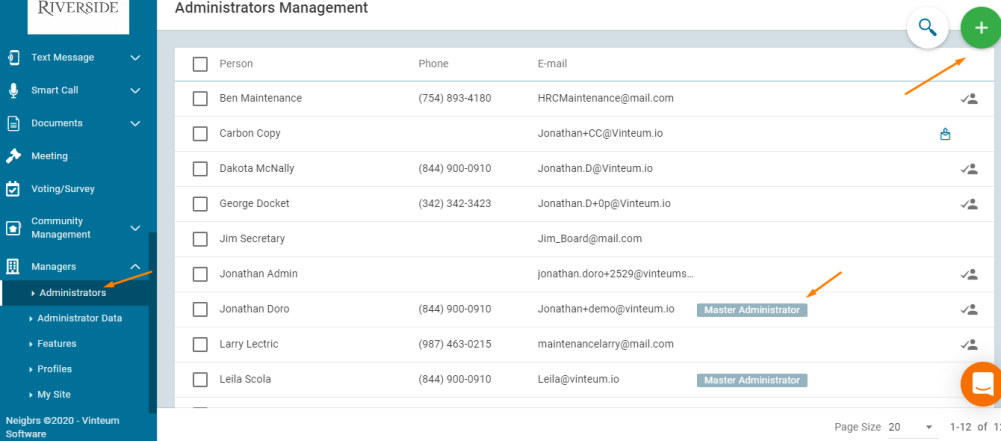
Administrators
To add new administrators, click on the green plus button, include the name, email address, and choose if they’re an administrator or master administrator.
Hover over the name and you can invite them.
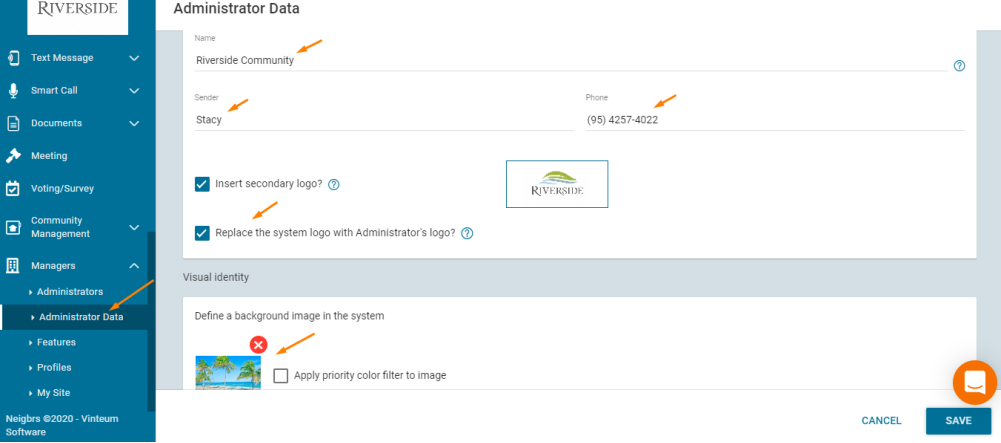
Adminstrator data
In administrator data, you can choose the branding for your portal. Include the name and sender for emails, you can add a phone number. You can include a secondary logo, and replace the Neigbrs logo with your logo. If you log in through your website, you can also change the login picture to either a gallery image or one you choose. If you select a different image, it has to be 1626x1080 pixels. The maximum image size must be 1 Mb.
Features & Profiles
The features and profiles tabs are the same as in community management, but it will change across all communities if you have more than one.
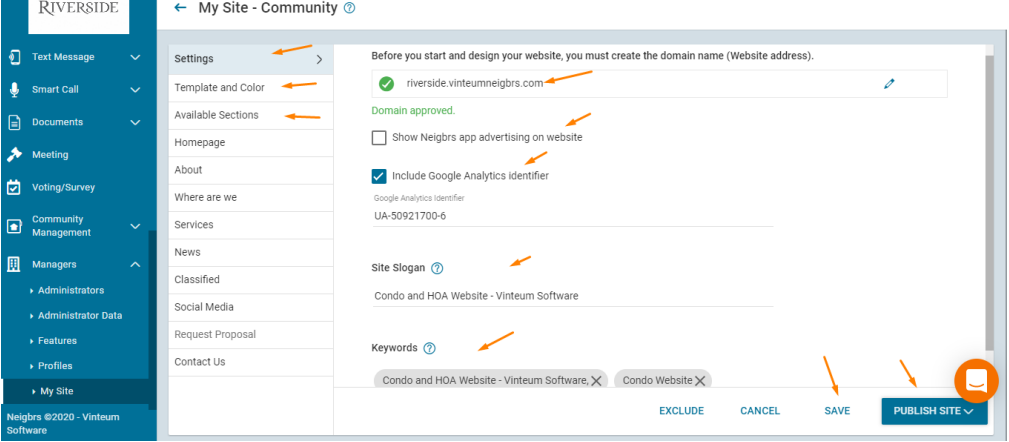
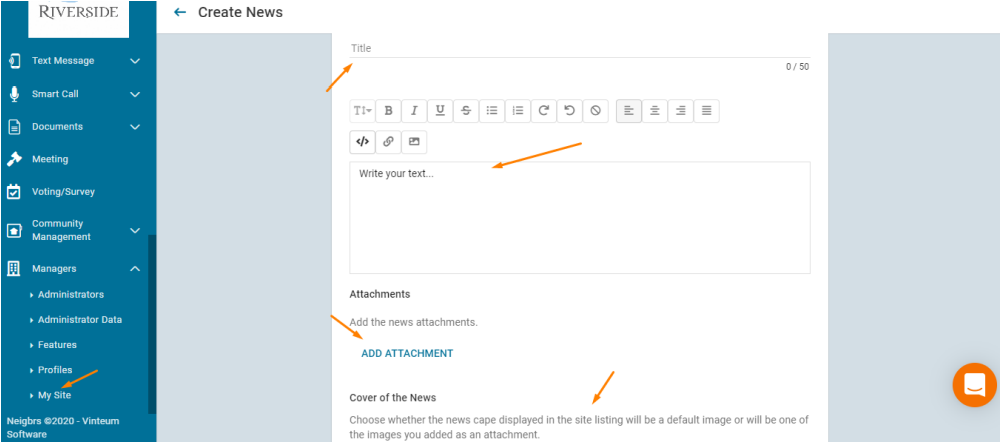
My Site
In my site, you control your public website (like riverside.vinteumneigbrs.com).
You can remove the Neigbrs advert from your website, and include Google Analytics if you want to track your website data. Add your slogan and keywords.
Then save and in order to make it live, publish site. In template and color, you can change the template and the color of buttons. In available sections, you can choose which sections are available.
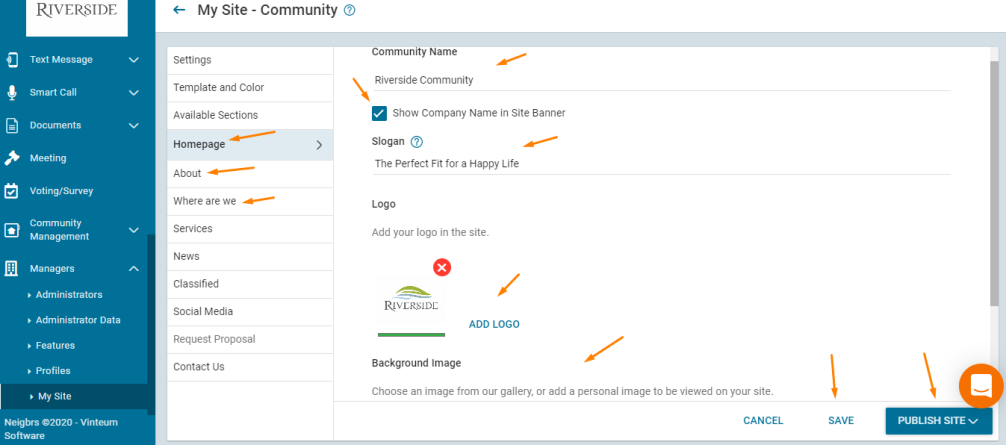
On the homepage, include the community name and include it in the main section, then include a slogan. Then add a logo and you can add an image.
Again, make sure to save. In about, include a description, images then save. In Where are we, you can add your address, then save and publish site to make it live.
Services and news are where you can publish different posts. You can change the name of the section in the section title, and you can choose to include short descriptions.
To add a new service, click on new then include an icon, title, and your text and publish.
In news, include a title and message, then you can include pictures by clicking on add attachment. You can add that image as the cover under Cover of the News.
In social media, include links to your social media pages, in classifieds, you can post homes for sale. Finally, in contact us, you can personalize your website’s contact form. Always remember to save and then publish.

N.B. If you are an administrator, master administrators can reduce your permissions.